A novel inverter design using GaN transistors with a power density of 61.2 W/in3
In response to Google’s Little Box Challenge (LBC), our Virginia Tech team, the Future Energy Electronics Center (FEEC), decided to design a power inverter. As shown below, our design significantly surpassed the LBC specifications.
Our final design exhibited a power density of 61.2 W/in3, exceeding the LBC goal of 50 W/in3 by 22.4%. GaN transistors played a crucial role in our ability to achieve this level of performance, and ultimately take third place in a field of 2,000 competition entries (see Figure 1). This article details our design approach, and the considerations we made while developing our inverter, with suggestions for future designs. GaN transistors were also instrumental in the LBC winning design which produced a power density of 143 W/in3.

Click image to enlarge
Figure 1: The final design exhibited a power density of 61.2 W/in3
Approach
Our overall approach was to create a two-stage inverter design: a DC/DC stage that stepped down the voltage and actively canceled the 120 Hz input ripple, followed by a DC/AC stage. Originally we chose an interleaved topology for the DC/AC stage (see Figure 2) consisting of two high frequency legs and one low frequency leg. Using six GaN Systems GS66508P transistors we achieved a peak efficiency of 99.3% with hard switching at 60 kHz in the high frequency leg, and 60 Hz in the low frequency leg.
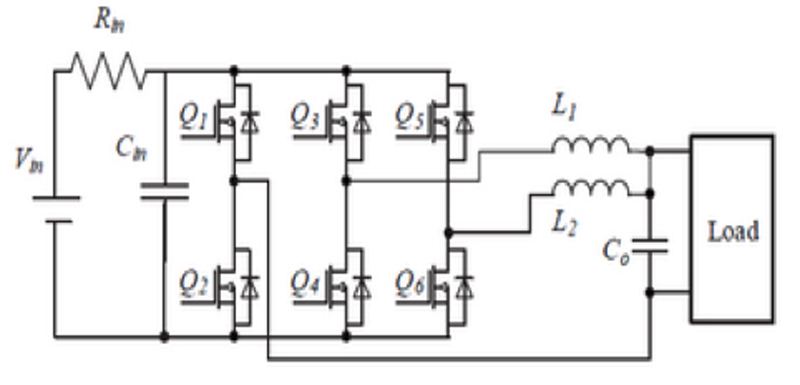
Click image to enlarge
Figure 2: Inverter topology without considering power decoupling
However, when we began to test leakage current we saw a spike near the zero crossing (see Figure 3). To remedy this we changed to a HERIC DC/AC topology (see Figure 4). Using six GS66516T transistors, this stage reached 98.97% peak efficiency. We selected these devices because they are top-cooled and have a small RDS(on) for higher efficiency.

Click image to enlarge
Figure 3: Modulation strategy

Click image to enlarge
Figure 4: Switch-level schematic of the FEEC Little Box
The enclosure we used was made entirely out of copper. The lid served as the heat sink for the DC/DC stage and the rest of the case served as the heat sink for the DC/AC stage PCB. Originally, we had hoped to reach such a high efficiency that the case-as-heatsink would be enough and we wouldn't require any forced-air cooling. In the end, however, we added a handful of 0.1W micro-fans for some forced air cooling. The thin, top-cooled GaN Systems transistors allowed us to place the devices on the bottom of the PCB and directly connect to the case-as-heatsink while the remaining components were populated on the top of the PCB and faced the inside of the box (see Figure 5).

Click image to enlarge
Figure 5: PCB layout.
Initially we killed devices attempting to work out the gate driver issue. We only killed one or two devices, but this occurred under system-wide failure where several things failed, so we we're unsure of the source of this failure.
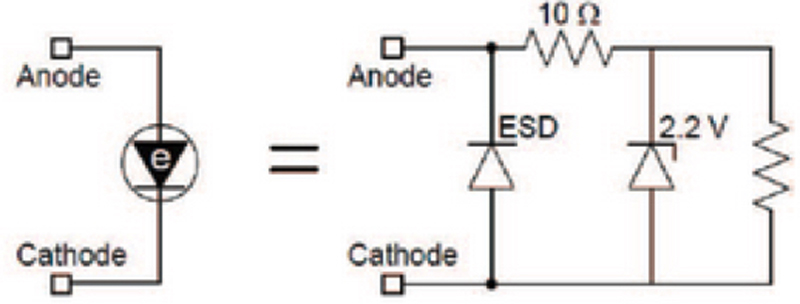
It took several design iterations to arrive at our final gate-driver design for the GaN devices. We finally decided on a Silicon Lab Si8261BAC driver and a custom-designed 12V to 7V isolated power supply for each device. As a consequence of the high speed switching transition of GaN devices, CM noise is easy to couple and interfere with the control circuit.
If the control circuit is not well designed, the power switch can be falsely turned on or off. An opto-coupler based gated driver is good for CM noise immunity, but it occupies a lot of space occupation and introduces propagation delay. The Silicon Lab gate driver chip employs LED emulator as the input stage to be compatible with traditional opto-couplers with smaller volume and shorter delays. But even with the LED emulator as the input stage, the gate driver chip still has the chance to falsely drive the power switch on/off.
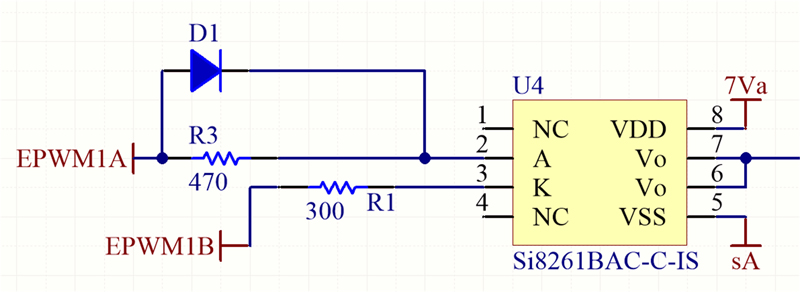
To solve this problem, we used a new connection, as shown in Figures 6 and 7. Since the gating signals are complimentary, if PWM1A is high and PWM1B is low, U4 is enabled with positive voltage. When PWM1B is high and PWM1A is low, U4 is disabled with negative voltage and the reverse diode of U4 conducts the reverse current. Compared to the case that connects K to ground, the proposed method is more reliable. The effectiveness is also verified by the experimental test.
Click image to enlarge
Figure 6: Gate driver equivalent circuit
Click image to enlarge
Figure 7a: Proposed connection for the gate driver
With everything properly designed, the devices were robust enough to pass Google's 100 hours of testing.
Future Designs Suggestions
From our experience, here are several suggestions for future designs:
• In the PCB layout, maintain a clear gap between the high and low voltage.
• Place the High and Low side switches close together to minimize parasitic inductance. The trace connecting to that intersection point should be narrow to help with EMI and system efficiency because it reduces the equivalent output capacitance.
• Current driving with LED emulator is better than just using a logic signal. This operation is similar to the traditional opto-coupler as it helps to reject noise.
• Use an anti-parallel diode between A and C on Si8261BAC to conduct current so that the input can be reversed biased (the voltage on A is higher than the voltage on C) to prevent false turn-on.
• Connect the gate drive ground directly to the source tab to avoid the parasitic inductance in the gate driver loop and to decouple the relationship between the power loop and gate driver loop.