Modules address inappropriate component selection and board layout issues
Miniaturization and a low profile are demanded of the semiconductors and electronic components used in portable devices such as smartphones and tablets. Accompanying the lower voltages and larger currents used in semiconductors in devices, DC/DC converters, which have a higher conversion efficiency than linear regulators, are seeing increasing use.
DC/DC converters normally include a power control IC, coil, capacitor, and resistor. For this reason, more mounting space is needed than a linear regulator, which contributes to increased board cost. In addition, inappropriate selection of components and board layout may lead to circuit malfunctioning and noise problems. As a solution to these issues, micro DC/DC converters are gaining increasing attention. Micro DC/DC converters have a small number of components, and thus the board layout is simple and little noise occurs, which helps reduce development time.
Structures and Features of micro DC/DC Converters
TOREX micro DC/DC converter products are centered on a switching regulator with a single output that integrates the control IC and coil. The package structure is determined by consideration of the product specifications, IC, coil, heat generation (heat dissipation), and other characteristics. Each package structure has advantages and disadvantages (see Table 1). In the Type –1 structure, the coil lies flat on the IC package. This shortens the path of the switching current and minimizes noise. In the Type – 2 Structure, the resin mold mounts the IC chip on top of the coil. This is relatively inexpensive because a coil with a generic shape can be used. In the Type – 3 structure, the coil and IC chip are placed side-by-side in the resin mold. The IC and coil have good heat dissipation, so large currents can be used.

Click image to enlarge
Table 1: Structure and features of micro DC/DC converters - ◎ Best, ○ Better, △ Good
Designed for Noise Reduction
In order to obtain full performance from electronic components, “whether or not the design achieves noise reduction” is an important concern from the stage of circuit design. However, even though the power circuit is a source of noise, component selection comes last. No matter how high the performance of the ICs and LSIs that are used, it will not be possible to obtain good performance from these components if the power circuit design is bad. In order to reduce noise in TOREX micro DC/DC converters, a variety of measures are taken, including:
・ Using a coil with minimal flux leakage
・ Adjustment of coil characteristics for the micro DC/DC
・ Optimization of DC/DC operation
・ Deciding pin assignments and structure based on consideration of the current path
Using measurements of radiated noise and near magnetics field strength, the following section describes the extent to which noise characteristics actually differ in “a power circuit composed of discreet components (XC9236)”and in “a micro DC/DC converter (XCL206)”.
EMI (Electromagnetic Interference)
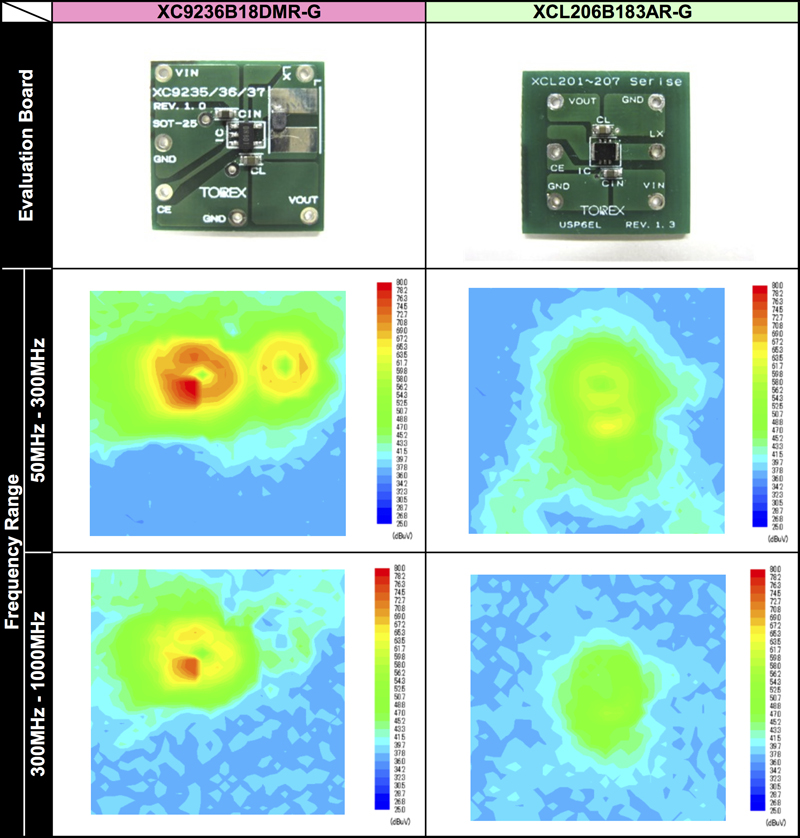
Figure 1 shows a comparison of radiated noise in two products, the “XC9236B18DMR-G” and the “XCL206B183AR-G”. The XC9236 (black waveform) generates noise over a wide range from 50M to 300MHz. By contrast, the XCL206 (yellowish green waveform) has a very low noise level. Even at the same operating frequency, the difference is clear. For this reason, the XCL206 (micro DC/DC converter) does not require full implementation of the noise measures that always tend to be put off until later. And on the XCL202 (Freq = 1.2MHz), which has the same structure as the XCL206, the operating frequency is reduced for even lower noise. Testing conditions: VIN = 3.7V (DC power supply), VOUT = 1.8V, IOUT = 200mA (resistor: 9Ω), XC9236B18DMR-G (Freq = 3MHz): Cin = 4.7μF, CL = 10μF, XCL206B183AR-G (Freq = 3MHz): Cin = 4.7μF, CL = 10μF.

Click image to enlarge
Figure 1: Radiated Noise, XC9236B18DMR-G vs. XCL206B183AR-G
Near magnetics field strength
Figure 2 shows a comparison of the near magnetics field strength of the “XC9236B18DMR-G” and the “XCL206B183AR-G”. The near magnetics field strength does not always correlate directly to the strength of unwanted radiated noise, however, it provides an effective means of identifying noise sources due to high-frequency current flowing in the board. Testing conditions: VIN = 3.7V (DC power supply), VOUT = 1.8V, IOUT = 200mA (resistor: 9Ω), XC9236B18DMR-G (Freq = 3MHz): Cin = 4.7μF, CL = 10μF, XCL206B183AR-G (Freq=3MHz): Cin = 4.7μF, CL = 10μF.
Click image to enlarge
Figure 2: Near Magnetics Field Strength, XC9236B18DMR-G vs. XCL206B183AR-G
Using micro DC/DC converters effectively
A micro DC/DC converter can be operated without detailed knowledge. A basic knowledge is sufficient to reduce noise and heat generation in circuit components, increase component reliability, and improve product acclaim. A micro DC/DC converter requires only half the mounting space of a regular DC/DC converter consisting of discrete components, and thus also helps save board cost. The same board space as a linear regulator is sufficient.
Efficiency and component temperature
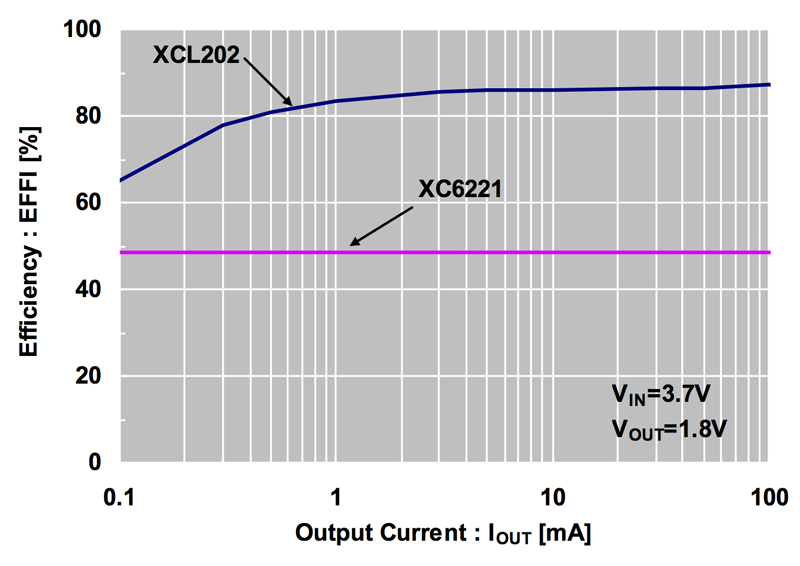
There is a large difference in power conversion efficiency between linear regulators and micro DC/DC converters (see Figure 3). This difference in efficiency creates a big difference in device battery drive time. The efficiency difference is loss due to conversion to IC heat (see Figure 4). Testing conditions: VIN = 3.7V, VOUT = 1.8V, IOUT = 100mA (resistor: 18Ω), Ta = 23.4°C
Click image to enlarge
Figure 3: Power Conversion Efficiency, XC6221A182MR-G vs. XCL202B181BR-G
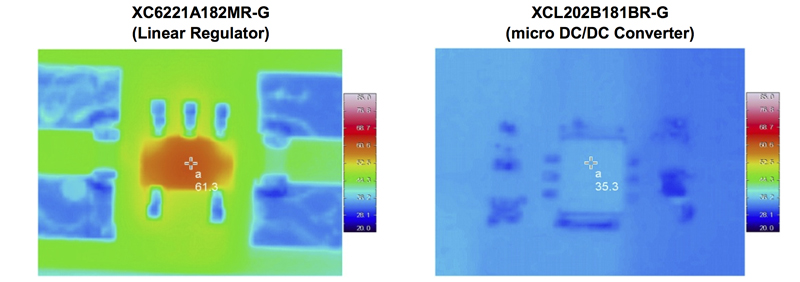
Figure 4: Heat Characteristics, XC6221A182MR-G vs. XCL202B181BR-G
Board Layout Points
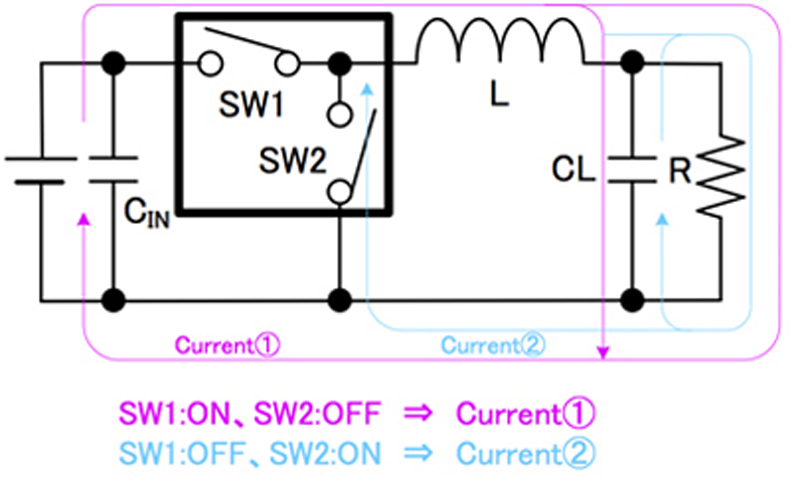
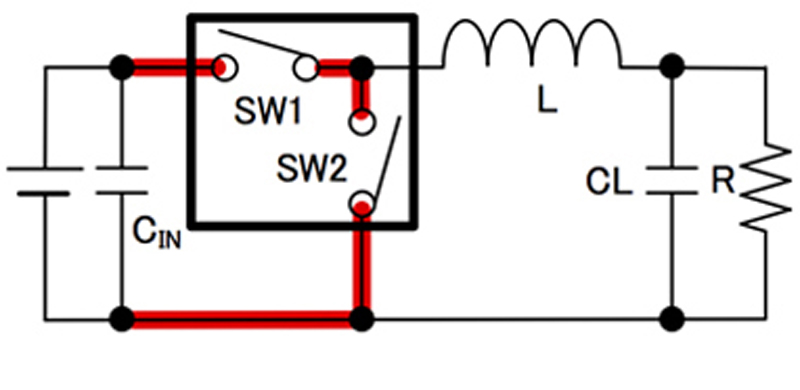
The GND wiring appears simple in the circuit diagram, however, in some cases the actual layout on the printed circuit board is very difficult. It is not a matter of simply making connections, because if the connection positions and board layout are bad, the performance of the entire system will be degraded. For example, a step-down DC/DC converter alternately switches switch 1 (SW1) and switch 2 (SW2) ON/OFF, controlling the currents in order to stabilize the output voltage. The currents that flow when this is done are Current (1) and Current (2) (refer to Figure 5).
Click image to enlarge
Figure 5: Current Path of Step-Down DC/DC Converter
Current only flows in the red wiring shown in Figure 6 when either Current (1) only or Current (2) only operates. When switch 1 (SW1) and switch 2 (SW2) are switched, the switching current is instantaneously interrupted, causing the L (inductance) component of the wiring to generate an electromotive force.
The detailed steps that must be taken are explained below using circuit diagrams.
To reduce noise, the red wiring in Figure 6 must be kept short. Apart from the wiring inside the IC, the input capacitance (CIN) should be placed near the VIN – GND pins of the DC/DC converter and connected with short wiring. Caution is required because GND in particular will disperse noise throughout the entire system.
Click image to enlarge
Figure 6: Step-Down DC/DC Converter Noise
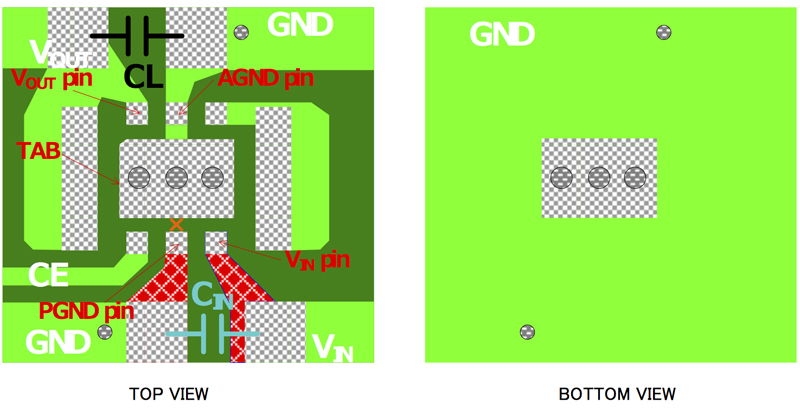
The next explanation refers to the actual test board of the XCL206 (micro DC/DC converter). There is a power GND (PGND) and an analog GND (AGND). In this case,
the input capacitance (CIN) can be connected by a short connection to the power GND (PGND) to make the area of the GND pattern (red) where the electromotive
force generated is extremely small (see Figure 7).
Click image to enlarge
Figure 7: XCL206 Printed Circuit Board Layout
In terms of pin assignments on the XCL206 test board, the layout of the GND pattern appears to be simply a matter of connecting the power GND (PGND), TAB, and analog GND (AGND) in a line on the front pattern. However, from the perspective of noise, caution is required because the current path changes and the effectiveness of CIN drops, resulting in a negative effect.
Manufacturers inside and outside Japan have recently been aggressively pursuing the development of wearable devices. Starting several years ago, many TOREX micro DC/DC converters have been adopted for use in GPS watches (sports watches), HMDs (Head Mounted Displays), pulse oximeters, and other devices. Wearable devices are worn for long periods of time, and as such their design reflects concern for preventing “burn injury due to component heat generation”, “battery drive time”, and “the effects of high frequency noise on the body.” This is a likely reason for the increased use of micro DC/DC converters with their compact size, high efficiency, and low noise among the manufacturers.